
Friday, 30 April 2010
Thursday, 29 April 2010
Saturday, 24 April 2010
Initial sketches for another part of the narrative, showing the ride in motion.
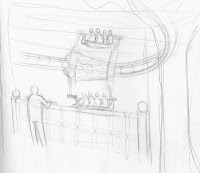
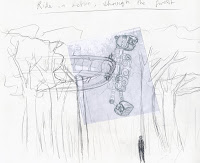
I've spent the best part of today starting to organise my portfolio. I hate doing it so much. I'm a sketchbook person. *grumble*
OH, and btw, in case you wondered, that's glue and paint and years of being arty on my floor. Needanewcarpet.


I've spent the best part of today starting to organise my portfolio. I hate doing it so much. I'm a sketchbook person. *grumble*

OH, and btw, in case you wondered, that's glue and paint and years of being arty on my floor. Needanewcarpet.
Friday, 23 April 2010
Tuesday, 20 April 2010
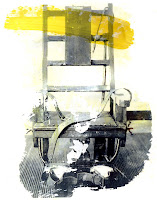
Kyle linked me to Thrice's blog where they have announced a merchandise design competition. I thought I'd give it a go, but since I'm short of time I'll work it into my self defined project for uni work. Here's my first idea based on the song Wood and Wire. Acrylic and gel transfer on paper.

Monday, 19 April 2010
Sunday, 18 April 2010
Thursday, 15 April 2010
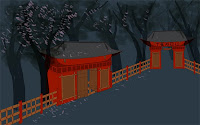
what I've achieved since the last update. Rocks are just as hard to paint as I remember them being. The red blobs in the trees will be lanterns, hopefully I can make it look like they are lit, too. It looks a little halloweeny, but I think that's a good thing. Japanesey, but dark and mystical? without being too Oriental-cliche, whilst still using regonisable features for a Western audiance. Still unsure about cherry blossom.


Monday, 12 April 2010
Pretty sure I'm going to do the "final" images in photoshop. It's just the most practical. However, I want the non-structural elements to be freehand drawn to retain the fluidity accomplished in earlier watercolour experiments. So frees and details such as rocks and ornamental pieces will all be drawn freehand. Was experimenting here with how I can get cherry blossom in without loosing the dark foresty appearance. The first image has a colour filter that I forgot in the second.



Sunday, 11 April 2010
How I usually do line work...
If you're anything like me, you hate the idea of potentially ruining a nice drawing with a slip of the hand when you outline it with pen.
I use this same method for fixing drawings too.
You will need a scanner, photoshop, and a printer.
If you've got a drawing that you want to ink, or a drawing that needs editing, scan it into photoshop. Add a new layer and fill it with red. Set that layer to "Screen". This turns the drawing red, which is easy to remove later, allowing you to ink over it or fix areas whilst tracing the areas that are perfect.
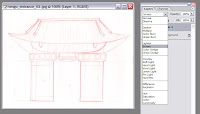
Print it. Another benefit of this method is you can enlarge tiny drawings, or shrink large ones so you don't have to do so much linework.
You can now draw over the red sketch, fixing errors with pencil, or if your happy with it just going over the lines with pen. If you make mistakes with pen, don't worry, you can get rid of them in photoshop!
Re-scan the drawing. To remove the red, click the channels tab on the layers window and click the red channel so that it's the only one on. All the red will dissapear!
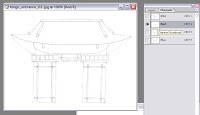
Go to Select - All and Edit - Copy and paste it into a new document. It should only be the black lines. You're gunna need to change the mode to RGB because it will now be on black and white. Image - Mode - RGB Color. Don't flatten.
Go to Image- Adjustments - Brightness and Contrast to make the white whiter and the black lines blacker.
To remove all the white so that you can paint under the lineart in photoshop, go to Select - Colour Range and click the white area. You can now delete all the white.
Alternatively, you can just set that layer to "mutiply" from the same drop down that you selected Screen from earlier. This makes all the white see-through and allows you to paint underneath.
Sounds confusing at first but you soon get used to it. :) I like this method cuz it's also useful if you draw off the page and want to add more to the image. Hope this helps some people out. Or you might think I'm doing this arse-backwards and have a better way, I'd love to hear how you do it if that's the case!
I use this same method for fixing drawings too.
You will need a scanner, photoshop, and a printer.
If you've got a drawing that you want to ink, or a drawing that needs editing, scan it into photoshop. Add a new layer and fill it with red. Set that layer to "Screen". This turns the drawing red, which is easy to remove later, allowing you to ink over it or fix areas whilst tracing the areas that are perfect.

Print it. Another benefit of this method is you can enlarge tiny drawings, or shrink large ones so you don't have to do so much linework.
You can now draw over the red sketch, fixing errors with pencil, or if your happy with it just going over the lines with pen. If you make mistakes with pen, don't worry, you can get rid of them in photoshop!
Re-scan the drawing. To remove the red, click the channels tab on the layers window and click the red channel so that it's the only one on. All the red will dissapear!

Go to Select - All and Edit - Copy and paste it into a new document. It should only be the black lines. You're gunna need to change the mode to RGB because it will now be on black and white. Image - Mode - RGB Color. Don't flatten.
Go to Image- Adjustments - Brightness and Contrast to make the white whiter and the black lines blacker.
To remove all the white so that you can paint under the lineart in photoshop, go to Select - Colour Range and click the white area. You can now delete all the white.
Alternatively, you can just set that layer to "mutiply" from the same drop down that you selected Screen from earlier. This makes all the white see-through and allows you to paint underneath.
Sounds confusing at first but you soon get used to it. :) I like this method cuz it's also useful if you draw off the page and want to add more to the image. Hope this helps some people out. Or you might think I'm doing this arse-backwards and have a better way, I'd love to hear how you do it if that's the case!
Saturday, 3 April 2010
Thursday, 1 April 2010
It occurred to me this morning how lazy I was being with this project and not going very in depth into designing the different elements. Nor was I utilising my research to it's potential and I jumping ahead of myself way too often which caused me to leave out vital things and just have a bunch of cliches and bad drawings.
That crap stops today. Refinements and designs based on research but with relevant changes and creativity for the subject matter from now on. In this case you can see thought actually going into the entrance design. Shock horror. I worry myself sometimes.
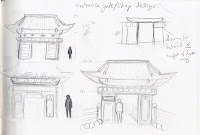
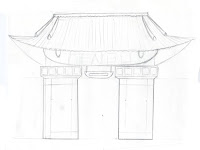
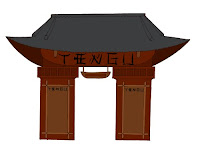
That crap stops today. Refinements and designs based on research but with relevant changes and creativity for the subject matter from now on. In this case you can see thought actually going into the entrance design. Shock horror. I worry myself sometimes.


Subscribe to:
Comments (Atom)


